To accommodate crews working on the Senior Center, from Thurs., Aug 1 through Sat., Aug 3 the Recreation Center elevator will be out of service. On Thurs., Aug 1, from 8am to noon, the Recreation Center locker rooms will be closed and the entrance to the Center will be limited to the southeast side, next to the lobby and the emergency exit. Also, on Thurs., Aug 1, from noon to 5pm, the Recreation Center’s pool and locker rooms will be closed and the hot water will be shut off. We appreciate your patience during this time.
To accommodate crews working on the Senior Center, from Thurs., Aug 1 through Sat., Aug 3 the Recreation Center elevator will be out of service. On Thurs., Aug 1, from 8am to noon, the Recreation Center locker rooms will be closed and the entrance to the Center will be limited to the southeast side, next to the lobby and the emergency exit. Also, on Thurs., Aug 1, from noon to 5pm, the Recreation Center’s pool and locker rooms will be closed and the hot water will be shut off. We appreciate your patience during this time.
As we move through March into April (hopefully without the need for extra tall snow boots), you may notice some of the buds on your trees and shrubs beginning to plump. Like our native seeds, woody plants also get signals from the environment (longer days, number of those days above a certain temperature, available moisture, etc.) that prompt the plant to begin the process of emerging from winter dormancy.
With low potential for spreading disease and very evident branching structures, it is a great time to prune many landscape trees. Here are some simple guidelines to follow.
When ready to trim your smaller trees, it is a good idea to first assess for dead, diseased, and damaged branches and work to remove them. Then stand back and assess the balance and habit of your tree—it may be that some lower limbs make it difficult to mow (we get that one a lot here at the Park District), or some growth is skyrocketing upward (water sprouts or suckers), others may be crossing and rubbing causing damage where they meet. Take some time to identify which branches are good candidates for removal before making your move.
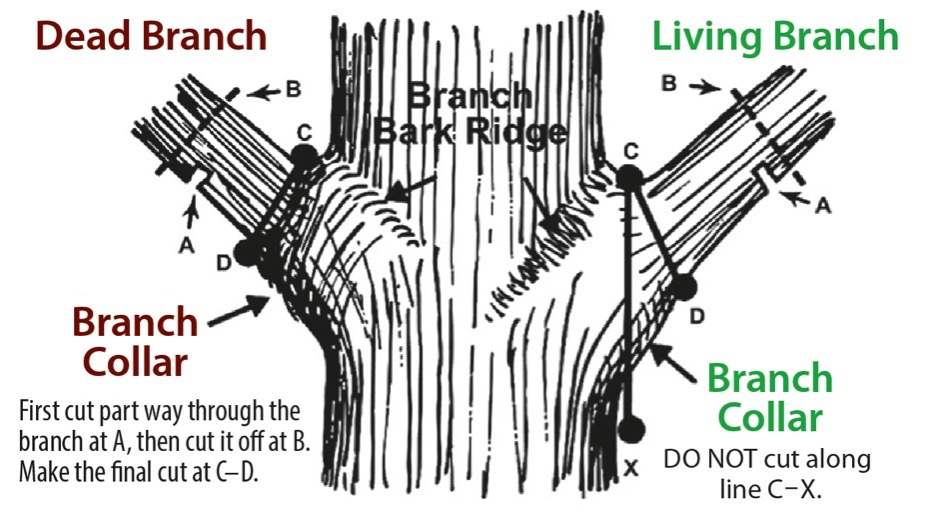
Diagram showing 1-2-3-cut (A-B-C), Arbor Day Foundation.
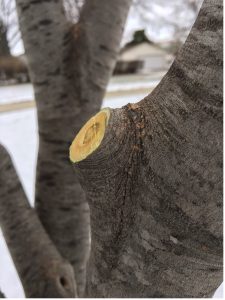
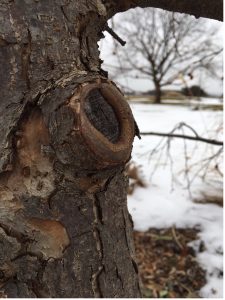
Something that I often see in home landscapes is a branch that has been cut at an arbitrary point, leaving a blunt stub with no buds or adjacent branching to take over. In many species, this stub will begin to die back causing disease and rot to enter the hardwood of the tree and outer bark. To avoid this when pruning, look for the branch collar—a slight bump where the branch meets the trunk or larger limb—and make your cut near this juncture. If there is some heft to your branch, you will want to remove it in three steps. First, to prevent tearing the bark, make an undercut six inches or so from where the limb connects to the trunk or larger branch. Next, perform a reduction cut at some point beyond your under-cut to remove some of the weight before going in for the final precision cut just outside the collar. Saw at a slight angle so you make the smallest wound possible. There will be a short nub when done, but not too short so that the cut is flush against the trunk, and not too long that the tissue of the tree is unable to grow over and seal up the wound.
A proper pruning cut just outside the tree’s branch collar…
…will close up over time and protect the hardwood of the tree (right)
Of course, before you do any of this you should give your tools a tune-up—make sure your hand pruners and saws are sharp and clean. I use a folding hand saw and Felco bypass pruners, which can be taken apart, rubbed with steel wool or brush to remove any rust or dirt, lightly oiled, sharpened with a fine grit sharpening stone, and reassembled. There are many videos online that provide easy-to-follow demos. This goes for your bypass loppers as well. If cutting diseased branches, make sure to clean your tools with an isopropyl alcohol spray or wipe before moving on to avoid spreading disease throughout the tree or to another healthy plant. Dispose of all diseased branches. And remember to wear some protective glasses—even the most seasoned gardener needs to protect themselves from a poke in the eye.
If you now find yourself with a pile of tree debris, use the larger limbs to line pathways or to save for trellising summer vegetables. Smaller twigs can be chopped into pieces and left at the base of the tree as natural mulch. Healthy branches from flowering species such as Malus (apple/crabapple) or Amelanchier (serviceberry), can be trimmed to two feet or so and placed in a vase of water inside where it is warm for early spring flowers.
Have patience, enjoy the crisp winter air, and get this landscape task checked off your to-do list. If you see our staff and volunteers out (with saws in hand) please stop to say hello—and tell us what and how you are pruning.
Liz is a professional horticulturist, observer, artist and writer, and co-owner of North Branch Natives, an education-focused native plant nursery.